Serious photographers are careful planners. Photography is basically about light, so timing and positioning can be key. I’m just an amateur though, and most of my photographs are taken in the pursuit of other activities. Consequently, I don’t always plan things right.
Consider the shot below. It was taken on a hiking trip to Telescope Peak, almost two years ago. The purpose of the trip was to reach the peak, so I didn’t have time to carefully compose the photo or wait for the sun to move to a better position. I’d call it a nice scene, but not a particularly striking photograph.

This is precisely the sort of situation where post processing, using a tool like Lightroom, can make a huge difference.
Looking at the histogram for the photo confirms the obvious – the image is overexposed. Often, overexposure is impossible correct. Fortunately, this image has two things working for it: the overexposure is fairly mild, and the image was shot using the camera’s RAW format. So when I pull the exposure down by 0.5 stops in Lightroom, the result is a significant improvement.

The image still seems rather flat though. I could pull the exposure down further, but in this case the highlights are close enough to where I want them (i.e. clouds are white but not too white) that it seems a better idea to manipulate the tone curve instead. With the tone curve, I can adjust specific aspects of the images. In particular, pulling the “Lights” and “Darks” shadows down by 15 each helps give the image more depth, by accentuating the shadows and adding more color to the midtones. Since the colors still are a bit flat, I also choose to bump the saturation setting up, in this case to 20.

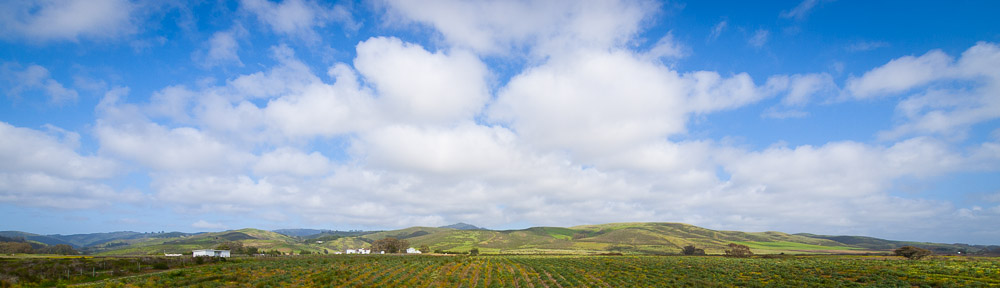
The next question is one of color temperature. The camera chose a ‘cool’ white-balance setting for this scene, meaning that the image is a bit on the bluish side. A warmer setting would mean a less blue sky, but a more vibrant foreground where the tree and grass in particular would stand out more. Was this how the scene really was? I’m not sure. But it feels right. So I change the WB temperature from 5000k to 5750k. To counteract the changes to the sky, I can drop the luminance of the blue channel by 15, increase the saturation for the blue by 30, and finally shift the blue calibration toward the purple by 15.

I rather like the result. Still not an award winning image no doubt, but also no longer an obvious candidate for the discard pile.
Now occasionally, I like to look at the image at full resolution (1 pixel of image = 1 pixel of screen). If this were a print, it would be like a 20×30 inch print, viewed from 18 inches away. This is how it looks without any special sharpening/correction applied.

On the whole, the level of resolution seems a bit weak. That might not seem like much of a surprise, since it was shot with a lens I picked up secondhand for $130, but fortunately, it can be corrected. The images from this particular camera can take a lot of sharpening before major artifacts appear. So I can increase sharpness significantly, to 50/0.7/65 (by trial and error, seems to be about optimal for this camera).

So what’s the moral of the story? I guess the first point is that you can do a lot with just a little bit of post-processing. Lightroom makes experimenting with different settings just about as painless as possible. I didn’t even get into any selective editing/masking.
However, the flip side is that while a lot can be done, it still pays to take the shot right in the first place. If I’d paid attention to the exposure, gone later in the afternoon, and positioned myself better, there’s no doubt that the photo would have been more interesting. And if you don’t have the time and patience for all that? Well, that’s why Adobe makes Lightroom.